

Captive Breeding Hermit Crabs
- thehappyhermie
- Oct 29, 2023
- 27 min read
Updated: Jan 22
Is it not feasible to breed hermit crabs in captivity without a scientific degree and laboratory setup? This is a common misconception within the global hermit crab community.
Repeatedly, we observe individuals dismissing captive breeding, believing it to be beyond human capability.
They are indeed mistaken. How do we know this? Because we have achieved it, as have many others globally. Our successful Australian breeders include Natalie Van Amstel, Sue Brown, Tiffany Michelle, Sharyl Hodgetts, Corina Headrick, Dairneen Burgess, Jodie Hebbard, Justine Britza, and Connie Jacques. Additionally, there are numerous aspiring breeders striving for success in breeding.
What was once considered impossible has now been demonstrated as feasible, groundbreaking science—not by scientists, but by at-home hermit crab owners.
The reality is that it is challenging and not suitable for everyone. It requires immense dedication, precision, time, patience, and the ability to learn from failures.
However, the most crucial aspect is that it is achievable. In the future, it will establish a new hermit crab trade that avoids taking them from the wild and harming them. Instead, it will focus on safely breeding them in captivity, ensuring they are raised in a nurturing environment from birth, making their transition into captivity a much more humane experience.
Common Myths About Captive Breeding
• You need a science lab and degree
This statement is inaccurate. Even scientists working in laboratories have not yet uncovered the secrets of captive breeding for this remarkable species. However, if your hermit crabs are inclined to mate, it is possible to breed them. Achieving this requires nearly ideal conditions, and the process of transitioning them from zoea to land is challenging. Nonetheless, it is certainly feasible to accomplish this in a home setting.
• Hermit crabs don't mate in captivity
For a significant period, this was believed to be true. However, with the continuous advancement in education regarding these species and the increasing number of owners establishing appropriate habitats, hermit crabs are now beginning to breed comfortably in captivity.
• Only experienced owners will have a zoea spawn
Breeding is not dependent on the owner's experience; rather, it is influenced by the environment the owner creates for their crabs. Even in their initial summer of ownership, crabs may breed. Ultimately, the decision to breed lies with the crabs themselves. The environment you provide plays a crucial role.
• You must isolate a female who is carrying eggs
Certainly not. This action will increase her stress levels, potentially leading her to release her eggs into the sand, where they may perish. If she has successfully mated in your main tank, it is advisable to keep her there. Transferring them between tanks only introduces unnecessary stress and could result in the loss of eggs.
• Eggs come before mating
No, the females do not carry eggs awaiting fertilization. The female lays her eggs only after mating. The exact time between copulation and egg-laying is not known, but it is believed to occur within hours.
• If the female has eggs, they will definitely spawn
Unfortunately, no. There are instances where female crabs may deposit their eggs on the sand due to stress or unfavorable water conditions. If this occurs, they will not be able to spawn. However, you may leave the eggs on the substrate, where other crabs will consume them.
• Mating takes place in marine water
Contrary to Google's claims, land hermit crabs engage in mating activities on land, typically seeking a secluded, dark area for this purpose. Occasionally, they may mate openly in captivity, and it is possible to observe them during this process. If you encounter hermit crabs mating, it is advisable to allow them privacy.
This blog post centers around the breeding process and life cycle of the Coenobita Variabilis (Australian Land Hermit Crab)
Hermit Crab Life Cycle
The transition from spawning to becoming a land hermit crab for the Coenobita Variabilis species takes approximately 15 to 25 days. This species experiences a significantly faster spawn-to-land cycle compared to other hermit crab species, characterized by a notably shorter larval stage.
Mating -
During the mating season, typically occurring in late spring to summer (often between October and March), the female hermit crab emits mating pheromones to signal her readiness to mate to nearby males. At this time, interested males will approach the female and exhibit guarding behavior. Mating will only occur with the female's consent. Although many males may express interest and compete for the opportunity to mate, the ultimate decision rests with the female, who selects her reproductive partner.
The male hermit crab approaches the female and gently rocks her shell back and forth, tapping or stroking it to encourage her emergence. The female partially emerges from her shell, at which point the male and female engage in copulation, holding each other in a manner resembling a cuddle, both partially out of their shells. The male transfers a sperm sac, known as a spermatozoa, to the female, who then applies it to her gonopores. Subsequently, the female lays fertilized eggs inside her shell. Hermit crabs always mate within their shells for safety and do not leave their shells during copulation.
Gestation -
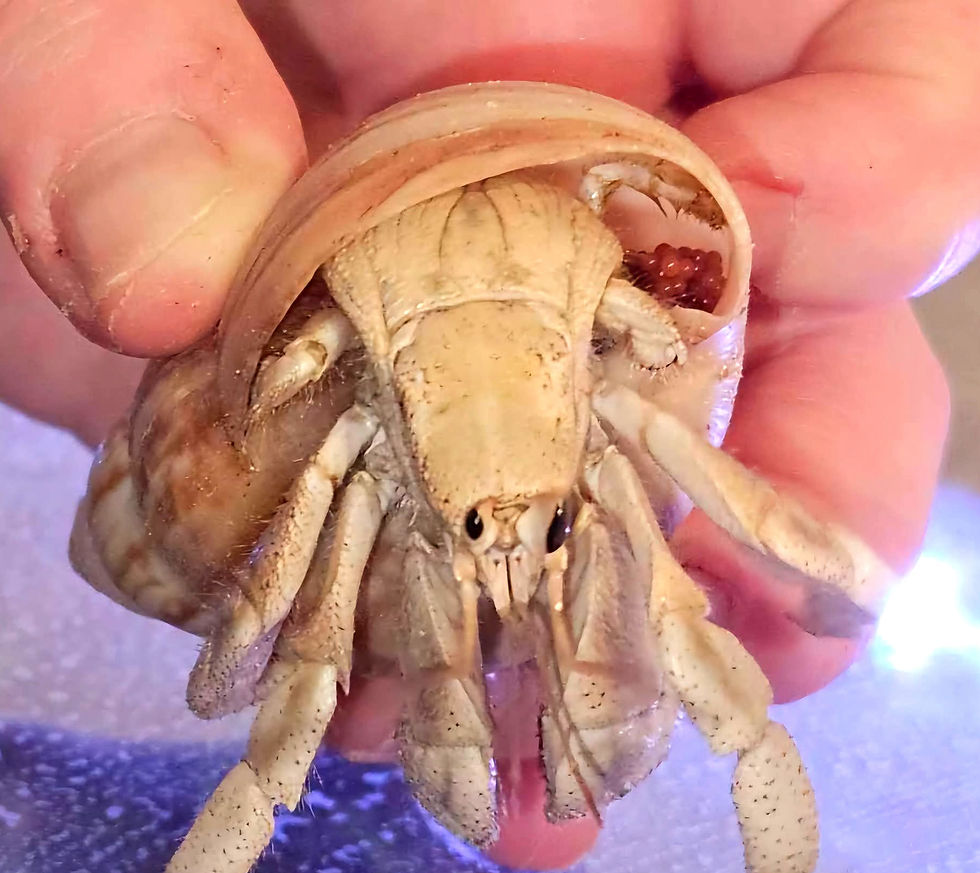
The female hermit crab carries up to a thousand fertilized eggs for approximately 4 weeks until they mature. These eggs are securely held inside her shell, positioned against the left side of her abdomen. Her pleopods, which are feathery appendages, ensure the eggs remain safely inside her shell until she is prepared to release them into the ocean or a salt pool.
Initially, eggs will exhibit a bright pink or red hue during the first week. As they approach their spawning date, they will transition to a pale pink color. Upon reaching maturity, the eggs will become translucent, indicating that the zoea have fully absorbed the egg yolk and are prepared to hatch and depart from the mother.
Spawning - The hatching of zoea occurs in marine saltwater environments. When the female is prepared for her eggs to hatch, she will move to a marine water body, such as a salt pool. There, she will carefully use her legs to extract the eggs from her shell and release them into the saltwater. Additionally, you may observe the female moving her body within her shell while in the water; this action facilitates the release of the eggs, allowing the zoea to swim out freely.
Upon contact with the saltwater, the eggs burst open, releasing the zoea. This marks the beginning of their challenging journey through three additional larval stages before they eventually transition to land as mature land hermit crabs. Until they embark on this journey to land, their development and growth occur entirely within the marine saltwater environment.
At this stage, it is time to transfer your new zoea to their kreisel tank. Ideally, the kreisel tank should already be constructed and ready for use. However, zoea can survive in the main tank for over 24 hours before needing to be relocated to the kreisel. It is crucial to eliminate any potential hazards within the pool, such as rocks, internal filters, and plants. Additionally, incorporating a bubbler into the pool will assist in keeping the zoea circulating and moving, mimicking their natural ocean environment.
Zoea Stage 1 - The initial phase of a hermit crab's life cycle is known as Zoea Stage 1, which occurs immediately following spawning. During this stage, they resemble small, translucent tadpoles with pointed heads. Within 2-3 days, they undergo molting and progress to Zoea Stage 2.
Zoea Stage 2 -
Your zoea have successfully molted and advanced to their second stage, marking a significant progression. This transition can be observed through the presence of sheds, which are empty skins that typically float near the water's surface.
Megalopa - Between days 5 to 8, you can anticipate the development of megalopa. At this stage, the zoea begin to resemble crabs more than tadpoles. Their appearance will be similar to that of a tiny lobster, complete with visible legs and claws. This marks an exciting phase! Commonly referred to as "Megas," they will require constant feeding. If not adequately nourished, they may resort to cannibalizing their siblings. Therefore, it is crucial to ensure they are well-fed at all times.
Not every zoea will progress to the megalopa stage and may unfortunately perish if they do not molt successfully. At times, zoea encounter difficulties during molting, resulting in only partial release of their legs, which may cause them to appear unusual with missing legs or claws. If these megalopa cannot molt successfully, they will regrettably not survive, as they are unable to feed themselves or protect themselves from the hunger of their siblings. Typically, they will pass away within a few days.
Once they reach the mega stage, they will begin searching for their initial shells in their kreisel, which you must provide. It is now time to establish a transition tank. This tank will serve as the habitat for your shelled megas as they prepare to move to land.
Shelled Megalopa -
Congratulations on reaching the next milestone in your captive breeding journey. The moment when your megas select their first shells is a significant achievement. Once they have chosen their initial shells, they will begin to explore the bottom of the kriesel tank in search of an exit, often attempting to climb the air stone. This behavior clearly indicates that it is time to transfer them to their transition tank.
Juvenile Land Hermit Crabs -
Once they have been placed into the salt pool of the transition tank, their journey becomes self-directed. Gradually, they will proceed to land, where they will begin to burrow into the substrate to initiate their first molt.
This is a rapid process due to the small size of the megas. It may occur overnight or within a few days. You will recognize when your shelled mega has emerged as a land hermit crab by their altered appearance; they will appear slightly darker in color and no longer translucent, often adopting an orange or light brown hue with more defined features.
Kreisel Tanks
A kreisel tank is a specialized aquarium designed for nurturing hermit crab zoea. The term "kreisel" translates to "spinning," which aptly describes the tank's function: to maintain continuous motion, allowing the zoea to spin and swirl throughout the environment.
Zoea require continuous movement to remain alive and facilitate molting. Maintaining constant water circulation in your kreisel tank replicates the oceanic environment, which is the natural habitat for zoea during spawning.
A kreisel tank typically comprises two compartments: a primary compartment containing the filter and water heater, and a separate compartment where the zoea are kept, with water circulating continuously.
To replicate oceanic conditions, kreisel tanks must be filled with marine saltwater and treated with Seachem Prime water conditioner. Freshwater or stagnant water is unsuitable, as it will not support the survival of the zoea.
There are two methods for constructing a kreisel tank. One can either construct a proper kreisel from the ground up or create a makeshift kreisel, commonly known as the jar method. As I have not yet had the opportunity to build a custom kreisel, I will outline the simpler jar method below. This approach is frequently utilized by novice breeders or individuals with limited space and resources.
Jar Method Kreisel
As the name suggests, this involves using coffee-style jars or large cylindrical vases. To implement the jar method, you will require the following equipment.
• Minimum tank capacity of 20 liters (my setup is 60 liters)
• Two large jars or tall cylindrical glass vases, each with a capacity of at least 1.5 liters; larger capacities are preferable
• Aquarium water heater
• Multiple aquarium water thermometers
• Air pump
• Air stones
• Airline tubing
• Seachem Prime water conditioner
• Marine salt
Position the jars within the tank and fill the tank with standard warm tap water. Ensure that the water level in the main tank is approximately one inch from the top of the jars. It is unnecessary to prime this water or add any salt. There should never be any zoea present in this water.
Position the water heater within the tank to ensure the water surrounding the jars is heated and maintained at 28°C. If using an adjustable water heater, set the temperature to 28-30°C, or adjust the settings until the water stabilizes at 28°C.
Attach a thermometer to the glass of the main tank to monitor the water temperature and position the remaining thermometers inside your jars.
Fill your jars with prepared marine saltwater, ensuring they are filled to the brim but not to the top edge. This prevents overflow and reduces the risk of zoea being expelled from the jars.
Attach the air stones to the airline and air pump, then position one air stone in each jar. The placement of the air stone is crucial for creating a circular motion in the water. This effect can be achieved by positioning the air stone at the bottom of the jar, slightly off to the side. While some breeders find that placing it in the center of the jar is more effective, we have experienced considerable success with it positioned to the side. Experiment with the placement of the air stone until you achieve the desired flow and movement.
With your kreisel having reached a temperature of 28°C and your bubblers operating at full capacity, your kreisel is now prepared for zoea.
The jar method serves as an excellent temporary kreisel for beginners or individuals who unexpectedly encounter a batch of zoea. Due to the lack of filtration and the smaller size of these jars compared to a traditional kreisel, regular water changes and testing are essential.
Common marine salt brands used by Australian breeders
Red Sea Salt
Aquaforest Sea Salt
Instant Ocean Sea Salt
Instant Ocean Reef Crystals
Tropic Marin Pro Reef Salt
Aqua One Synthetic Reef Salt
Halcyon Marine Salt
Dymax Reef Salt
Captive Breeding Checklist
Let's review the essential items you should have available if you decide to initiate captive breeding.
• Materials required for a temporary kreisel tank (as listed above):
• Ammonia Liquid Test Kit*
• pH Liquid Test Kit*
• Nitrite & Nitrate Liquid Test Kit*
• Calcium Liquid Test Kit*
• Refractometer
• Cuttlefish Bone Powder
• Pipettes (a substantial quantity)
• Small Shells (similar to shell grit)
• Plastic Tweezers
• Aquarium Syphon or Large Turkey Baster Pipette
• Additional 20L+ Transition Tank
• Extra Clear Containers
• Seachem Prime Water Conditioner
• Marine Salt (a significant amount)
• Small Transition Pools
• Additional Substrate
• Large 20L Water Bucket (with lid)
• Spare Aquarium Water Heater
• Spare Aquarium Thermometer
• Thermometer/Hygrometer
• Heat Mat & Insulation
• Natural wood such as cholla, driftwood, etc.
*I refer to liquid tests, as they are significantly more accurate than test strips and are favored by breeders for water testing. A commonly recommended brand is API. Make sure to choose a saltwater test rather than a freshwater one.
Foods For Zoea
• Marine Snow
• Live Phytoplankton (Nannochloropsis)
• Liquid Reef Roids
• Phytoblast
• Freshly Hatched Brine Shrimp
Foods For Megalopa
• Frozen Thawed Bloodworms
• Marine Snow
• Phytoblast
• Reef and Coral Foods (such as Reef Roids)
• Cuttlefish Bone Powder
• Bottom Feeder Pellets
• Betta Fish Pellets (Hikari is a preferred brand among breeders)
• Live Phytoplankton Nannochloropsis
• Fresh Foods - commonly selected options include strawberries, grapes, and raw carrots.
All of the items mentioned above will be invaluable during your captive breeding endeavors. Having them readily accessible will ensure a much smoother experience, as opposed to waiting for their delivery or searching for them locally at the last minute.
Mixing Your Marine Salt To The Right Ratio
This can be somewhat confusing as most owners prepare their saltwater pools with approximately 34g per 1L of water. While this concentration is suitable for adult crabs, it typically does not provide the precise salinity required by zoea, which is 1.026 (35ppt).
You will need to consult the specific instructions on your salt bag or bucket to determine the grams per liter. Most marine salt packaging includes a chart for fish, LPS corals, and SPS corals. You should locate the one that indicates a specific gravity (S.G) reading of 1.0264 or a salinity of 35ppt. Once identified, refer to the dosage section. It generally appears as shown below (please note this is an example, and different brands may vary).
415g/10L H²O (14.63oz/2.7 US gal)
Since we use grams in Australia, you should disregard the measurements in ounces and gallons. How can you determine this reading? You will need 415 grams per 10 liters of water. To calculate the weight for 1 liter, divide 415 by 10. Refer to the calculation below.
415 ÷ 10 = 41.5
This represents your 1-liter measurement: 41.5g.
The most efficient method for mixing salt is to do so in large batches of 15 liters or more. Utilize a large container, such as a repurposed 20kg marine salt bucket, which can accommodate up to 16-19 liters of water. Accurately measure each liter and pour it into the bucket until it is full, taking care to avoid overfilling and potential spillage. Since my container holds 16 liters of water, I multiply my salt measurement for 1 liter by 16. Refer to the calculations below.
41.5 x 16 = 664
Consequently, I will need to measure 664g of marine salt and mix it into my 16L water bucket. Insert a filter, water heater, and thermometer into the bucket, and ensure the lid is secured to prevent evaporation.
Alternatively, there is a salt water mixing calculator online. Being US based, you will need to convert gallons to litres and pounds to grams.

Finding Your First Zoea
Congratulations on discovering your first spawn of zoea in the saltwater pool. This is indeed an exciting moment.
The real work begins now. If you have a kreisel already set up and operational, you can transfer your zoea immediately. If this spawn was unexpected, there is no need to worry. The zoea can survive in the tank's saltwater pool for over 24 hours, often even longer, as long as there is adequate water movement and aeration.
It is advisable to anticipate some overnight losses.
If a kreisel setup is unavailable, you can promptly assemble a makeshift jar kreisel by following the provided instructions.
Once it is operational and maintaining the ideal temperature, you may transfer your zoea.
The most straightforward approach is to take the saltwater pool out of the tank and place it on a stable surface, such as a kitchen table or bench. It is advisable to sit down for the next step, as it requires considerable time and patience.
Removing the pool is feasible only if your pool is above ground and relatively small. For in-ground pools, you will need to extract the zoea in batches directly from the tank's pool.
Take one of the jars from the kreisel and place it near your work area. Immediately add an air stone to ensure water movement when you introduce the zoea. Using pipettes, carefully extract each live zoea from your saltwater pool. We strongly recommend counting each zoea as you extract them to establish a starting number, keeping in mind that this number will likely decrease significantly in the coming weeks. Gently transfer each zoea into the coffee jar kreisel. You may observe some dead zoea at the bottom of your pool, which typically appear white and motionless.
A healthy zoea will appear translucent with small black eyes and exhibit active movements. If there are rocks or pebbles at the bottom of your salt pool, ensure they are removed to locate any concealed zoea. It is advisable to optimize the use of your jars by distributing the zoea among them, ensuring ample space and reducing overcrowding.
My preferred method for extracting zoea from my large in-sub pools involves using a plastic jug to collect water from the pool and transferring it into a large, transparent container. I perform this process in batches, each time bringing the large container to the kreisel, positioning a light against it, and then transferring the zoea directly into the jars.
To effectively monitor the tiny translucent zoea, it is essential to position a light source on the side of your container. This illumination will not only aid in detecting the zoea but will also attract them, causing them to congregate at the illuminated edge of the container.
Continue this procedure until all zoea have been removed from your salt pool. Dispose of any deceased zoea appropriately.
Once all of your zoea have been added to the kreisel tank, the challenging work commences.
Day 1 (Zoea in Kreisel)
At this stage, the zoea will be actively dispersed in the water, simulating oceanic conditions. Rest assured, this movement is not too harsh for them and supports their initial molting process. While I do not personally feed my zoea, some breeders opt to do so. If you decide to feed your zoea, it is advisable to do so immediately and again approximately 30 minutes prior to a water change. Feeding can contaminate the water, so it is crucial to maintain regular water changes and testing.
Day 2 (Water Changes Begin)
Now begins the challenging task, a genuine labor of love: performing water changes. Raising zoea is akin to caring for a newborn, but instead of changing diapers, you are managing water changes.
The most efficient method for water changes involves using a clear container, an aquarium siphon, and pipettes.
To maintain consistent water temperatures, some breeders prepare a large container of primed and marine-salted water, using an aquarium water heater to keep it steadily at 28°C. By storing the water away from sunlight and covering the container with a lid, evaporation is minimized. This method ensures that water changes are conducted smoothly, without introducing marine water that is excessively hot, cold, or improperly mixed.
Prior to the shedding phase, it is advisable to perform 1-2 water changes daily. You should siphon out two-thirds of the jar's water and replace it with fresh, primed, and marine-salted water. If you encounter any deceased zoea, remove them from the jars, as they can contribute to increased ammonia levels, which is undesirable. Water changes present an opportunity to assess your water quality using liquid test kits. It is recommended to check ammonia, pH, calcium, nitrites, nitrates, and salinity. If checking all these parameters is not feasible, prioritize testing pH, calcium, salinity, and ammonia. With regular water changes, ammonia, nitrites, and nitrates should ideally remain at zero.
•RECOMMENDED WATER TESTING LEVELS•
Ammonia - 0
Nitrites - 0
Nitrates - 0
pH - 8-8.4
Calcium - 380-450
Salinity - 1.026 or 35ppt
Begin by removing the first jar and utilizing your siphon to extract two-thirds of the water into a transparent container. A clear container is advisable to easily identify if any zoea are accidentally siphoned. Should you siphon live zoea, use your pipette to return them to the kreisel jar.
If you observe any deceased zoea (characterized by a white or pink appearance, dark black eyes, and lack of movement), use the pipette to remove them from the jar and dispose of them appropriately.
Refill two-thirds of the jar with your fresh batch of marine saltwater, then return the jar to the kresiel tank.
Repeat this procedure with the remaining jars.
TOP TIP - If you are experiencing difficulty in seeing your zoea, illuminate them with a flashlight or place the jars on a dark-colored towel or blanket during water changes. This will enhance their visibility.
Checking Salinity Levels
A refractometer is an effective tool for measuring the salinity levels of salt water. These devices can be easily purchased from platforms such as Amazon, eBay, or local aquarium stores.
Although refractometers are accompanied by instructions, they may occasionally be difficult to interpret. Therefore, we provide a detailed explanation here.
To guarantee accurate results, it is essential to calibrate your refractometer before each use. The device will be equipped with a small screw for this purpose.
Calibrating
Apply a few drops of distilled water onto the prism surface of the refractometer. Ensure that no air bubbles are trapped under the cover, as this may result in an inaccurate reading. Position the refractometer on a flat surface for 30 seconds to allow the reading to stabilize. Point the prism end towards a light source and look through the eyepiece; it should display a reading of zero.
If the reading is not zero, adjust the calibration screw or knob until the scale indicates zero. Once the correct calibration is achieved, your refractometer is ready for precise measurements.
Reading Results
Apply a few drops of your kreisel water onto the prism surface of the refractometer. Ensure that no air bubbles are trapped under the cover, as this may result in an inaccurate reading. Position the refractometer on a flat surface for 30 seconds to allow the reading to stabilize. Point the prism end towards a light source and look through the eyepiece and read the number where the dark and light lines meet. See below.

Day 3 (Shedding & Water Changes)
At this stage, you may observe that some of your zoea have begun to molt. The presence of "debris" in your kreisel is indicative of this shedding process. This is a positive sign and completely normal. These will resemble empty exoskeletons or "ghost zoea," appearing motionless and floating. Congratulations on reaching zoea stage 2!

Maintain regular water changes; if you observe rapid water contamination, increase the frequency to three times daily, particularly during the zoea feeding stage. In the event of an ammonia spike, apply Prime to the jars and frequently replace the water. Neglecting water changes can result in elevated ammonia levels, which can be fatal to your zoea.
If your pH levels are too low, consider incorporating calcium into your water. After experimenting with cuttlefish bone, starfish, and sea urchins, I have found that adding cuttlefish bone powder to the pools is the most effective solution. However, please note that this may cause the water to become cloudy and may necessitate complete water changes at times.
I recommend adding Prime to your water (1-2 drops) at least four times a day and regularly monitoring the levels mentioned above, not solely during water changes. As a diligent caretaker, I tend to check these levels frequently throughout the day. However, do not be concerned if your schedule does not allow for such frequent monitoring due to work or other commitments.
Day 4 (3 x Daily Water Changes)
Please continue with your three-times-daily water changes and ongoing level monitoring. If cuttlefish bone powder is beneficial for maintaining the pH levels, incorporate it into each water change and maintain the prime dosing. Elevated ammonia levels can harden the water, which, in turn, can impede the zoea's ability to shed and progress to the megalopa stage.
We have discovered that improper calcium levels in the water can also hinder the shedding process, excessively hardening the exoskeleton and making it more challenging for them to break through.
Day 5 (Maybe Megas!)
By Day 5, we typically anticipate the emergence of megalopa, marking a significant advancement and an exciting milestone in the process.
If megalopa do not appear by Day 5, there is no cause for concern, as it may take a few additional days for them to develop. At this stage, your zoea will have developed crab claws and resemble tiny translucent lobsters.
It is important to separate the zoea and megalopa by placing all zoea into one jar and the megalopa into separate jars. This separation prevents the megalopa from preying on the zoea and allows the remaining zoea the opportunity to reach their megalopa stage.
This is the opportune moment to enhance your efforts with feedings and water changes. Anticipate a significant increase in mortality during this period, as mega will become progressively hungrier and may resort to consuming their siblings.
It is recommended to feed your mega multiple times a day with defrosted bloodworms, crushed betta fish pellets, phyto blast, marine snow, reef roids, and bottom feeder pellets. Additionally, you may offer them small pieces of fresh fruit, which will float on the surface, allowing the megas to feed from the water's surface. Be sure to remove any uneaten fruit after a few hours to prevent spoilage. The goal is to maintain a constant feeding schedule to reduce the likelihood of them preying on each other, while keeping water levels stable. Nevertheless, they may still exhibit cannibalistic behavior. Exercise caution to avoid overfeeding and diligently manage water changes and levels, as feeding can rapidly degrade water quality.
It is advisable to reduce the flow of your bubblers at this time to facilitate easier access to food and shells for your megalopa. You should introduce small initial shells for them at this stage. Select tiny whole shells from shell grit, which can be found in the bird or chicken food section at pet or produce stores and use a pin to clear the shell openings for accessibility. Ensure the shells are thoroughly washed to remove any debris before placing them at the bottom of the kreisel jar.
As you begin feeding multiple times daily, the water quality will deteriorate more rapidly. It is essential to maintain three water changes per day and remove any uneaten food promptly. Megas tend to latch onto bloodworms and extract their insides, so it is important to remove the remaining bloodworm carcasses once they have finished.
If you have reached day 5 and still have no megalopa, there is no need for concern at this point. Cooler water temperatures can sometimes delay the transformation of zoea. Unfortunately, any zoea that do not progress to the megalopa stage will not survive.
To minimize the risk of cannibalism, distribute the megas across multiple jars.
A well-fed mega can be identified by a dark gut tract, visible as a dark line along the center of its body, indicating adequate nutrition.
Day 8/9/10+ (Megas may start to take shells)
At this stage, it is essential to maintain your regimen of three water changes per day, ongoing water testing, and multiple feedings. By now, all zoea should have either transitioned to the megalopa stage or have perished.
You may also observe some of your megalopa beginning to adopt their first shells, a vital step for their survival as they transition to land. Those that do not acquire a shell will not progress to the next stage of life.
After several days, you will observe your shelled megas ascending the air stone. This indicates that they are prepared to transition to land, and it is now appropriate to relocate them to your transition tank.
Building A Transition Tank
A transition tank serves as the initial environment for your shelled mega to embark on their journey to land and where they will reside for the subsequent months as they develop and mature.
Fortunately, the tank does not need to be large. A 20L tank is generally sufficient for this setup; however, if you have a larger number of shelled mega, you might consider opting for a bigger tank.
The following items are required for setting up a transition tank:
• A glass fish tank with a lid, with a capacity of at least 20 liters
• Heat mat or cord
• Thermometer/hygrometer
• Play sand
• Coir peat
• Seachem Prime water conditioner
• Marine salt
• Small salt pool
• Shallow freshwater pool
• An item to facilitate climbing out of the pool (such as wood, a ramp, or mesh)
• Artificial plants
• Dry sphagnum moss
• Small, flat food bowl
• Small, flat shell shop *optional
• Tiny transition shells
• Air stone
• Air pump
• Air line
• Lighting
Properly setting up your transition tank is crucial and differs significantly from the recommended setup for your main tank. The substrate should be no deeper than 3-4 cm to allow the young to dig down for molting while ensuring they can easily resurface.
It is necessary to maintain a slightly damper substrate than what is typically used in the main tank. Due to their small size, these young ones are unable to burrow through dry sand. Distribute dry sphagnum moss around the tank's perimeter, adjacent to the glass, to capture condensation drips. Given the shallow substrate and elevated humidity levels, there is an increased risk of flooding in these types of tanks.
As they transition from an aquatic environment to a terrestrial one, it is crucial to maintain stable and higher temperature and humidity levels compared to your main tank. We recommend setting the temperature to 30°C and the humidity between 85-90%.
Ensure that your shell shop and food bowl are as flat as possible and level with the substrate to facilitate easy access to food and shells. Consider using flat silicone plates or inverted clam shells embedded in the sand, provided they are easily accessible.
Once your transition tank is prepared, proceed to move your shelled mega to the next stage. All shelled mega should be placed in the salt pool within the transition tank. It is essential that they have an exit from this pool, utilizing wood, ramps, fine mesh, etc., along with a bubbler to maintain fresh water. This ensures they can transition to land. While in the transition salt pool, continue providing the same foods offered in the kreisel. Bloodworms can be placed on the exit ramp or wood to encourage them to leave the water and explore.
They typically do not take much time to exit the water and commence their journey to land. Initially, they may appear hesitant, repeatedly emerging from the water and retreating as they determine their direction and necessary actions.
Once your shelled megas reach the sand, they have transitioned to land. However, the journey is not yet complete. They must dig down, undergo moulting, and emerge successfully moulted before you can claim to have successfully bred a hermit crab. Initially, they are not considered land hermit crabs. Only after their first land moult do they return with modified gills, officially becoming land hermit crabs. Due to their small size, their moulting process is brief, typically lasting 24-48 hours.
Initially, when they retreat from the pools, you may observe that they have a translucent appearance. After they have burrowed, moulted, and resurfaced, they exhibit a slightly darker and more solid appearance with more defined features. They appear somewhat orange or light brown, and their limbs are less transparent. At this point, you truly have captive-bred hermit crabs. Congratulations!
Please be aware that not all shelled megas in the transition pool will successfully make it to land; some may abandon their shells in the pool and, unfortunately, not survive. Similarly, some in the kreisel tank may never adopt shells and will also not survive. Once all your shelled megas have transitioned to land and are out of the transition pool, it is important to provide a small freshwater pool for them to drink from. It is advisable to use a shallow dish filled with small aquarium rocks and fresh, primed water. This setup allows them to drink without the risk of drowning. Ensure the rocks are placed at the top of the pool to facilitate easy access to the water.
Typically, at this stage, I replace the larger salt pool with smaller saltwater and freshwater pools, incorporating fine plastic mesh to facilitate climbing in and out. While adding bubblers is not mandatory, it does assist with water changes and maintaining humidity levels.
It is important to encourage your young ones to eat regularly throughout the day to build their strength. They will undergo significant molting and growth during this period.
We strongly advise providing them with foods they consumed during their aquatic stage of life. It is important to note that the scent of food on land differs from that in water, which may cause initial hesitancy in eating.
Recommended Foods for Land Babies
• Cuttlefish Bone Powder
• Crushed Betta Fish Pellets
• Crushed Bottom Feeder Pellets
• Thawed Frozen Bloodworms
• Greensand
• Worm Castings
• Reef Roids Powder
• Pureed Fruits such as Banana, Strawberry, Apple, etc.
• Egg Powder
• Kelp Powder
• Oyster Shell Powder
• Spirulina
• Flaxseed Powder
• Shrimp Powder
• Meats
• Crab Pastes
• Fruit & Vegetable Powders
• Hermit Crab Mixes
It is essential to ensure that all foods provided are either in powdered form or mashed/soft (such as fresh fruits and vegetables), as they lack the ability to break down large pieces of hard foods. Creating a stimulating environment in your baby tank is important to promote natural foraging and exploration for your new babies. Consider adding climbing structures, hides, plants, leaf litter, shells, vines, and wood, similar to your adult tank but on a smaller scale.
Why Didn't My Babies Survive After Their First Moult?
Regrettably, there are limits to what we can manage. The remainder is beyond our control. Baby hermit crabs, including zoea and megalopa, are highly fragile. Even minor environmental changes can be detrimental to them.
They might not have been resilient enough to endure another moult; it is possible they abandoned their shell and succumbed. Factors such as temperature and humidity fluctuations, along with emergencies like tank flooding, can also impact them significantly.
Captive breeding remains a relatively new field, with breeders worldwide continually gaining insights into the breeding and rearing processes each year. The complete understanding of these species' life cycles is still evolving, and even the most experienced breeders discover new information each season.
Our approach involves persistent annual efforts, meticulously documenting our methods, successes, and challenges. This process enables us to learn, educate, and contribute positively to the hermit crab pet trade.
For more information on captive breeding initiatives, please visit Hermit House. This is a dedicated community of breeders from around the globe who collaborate to learn, share, and support one another in this remarkable endeavor.
Trouble Shooting
• Low pH or Calcium Levels
To address low pH or calcium levels, introduce powdered cuttlebone or oyster shell into the kreisel water and stir thoroughly. Although this may temporarily cloud the water, the added calcium will effectively elevate both the pH and calcium concentrations.
• Mega are not eating
Occasionally, consuming their siblings can be more appealing than eating the food they are intended to consume.
At times, separating the mega from the kreisel and placing them in small containers with marine salt can encourage feeding. Simply fill a small container with marine salt water, add some bloodworms, betta pellets, etc., and place a few mega in with them. Allow them approximately 10-15 minutes to feed before returning them to the kreisel.
• Water Heater Not Achieving 28°C
The primary reason for this issue is often that the water heater's wattage is insufficient for the volume of water being heated. If your water heater is adjustable, setting it 2°C above the desired temperature can sometimes help achieve 28°C. Personally, I set my water heater to 30°C, which consistently maintains 28°C across all containers. Since all water heaters vary, it is advisable to experiment with yours to determine the optimal setting.
• Mega Not Retaining Shells
Have you observed your mega examining shells but not retaining them? It is possible that the shells provided are too large or heavy, which can make it difficult for your mega to carry them on their delicate bodies. Lightweight shells with small openings are more suitable and may be preferred over heavier, larger shells with wider openings. In my experience, my mega finds it easier to retain shell grit cone shells rather than heavier D-shaped nerites.
• Female Continuously Laying Eggs on the Sand
It is well understood that female hermit crabs have an instinctual awareness of optimal conditions for spawning. If your female crabs are consistently depositing their eggs on the sand, resulting in unsuccessful hatching, it is advisable to first inspect your saltwater pool for any irregularities.
● HELPFUL PHOTOS BELOW ●


コメント